How to make the amazing birthday card exploding box for beginners guide step by step:
Creating an amazing birthday card exploding box can be a fun and memorable way to celebrate someone special. Here’s a step-by-step guide to make one.
MATERIAL REQUIRED:
You required the material of an birthday card exploding box. Gather those things and your work easy.
- Cardboard box
- White paper
- Craft papers of different colours
- Scissors
- Marker
- Glue
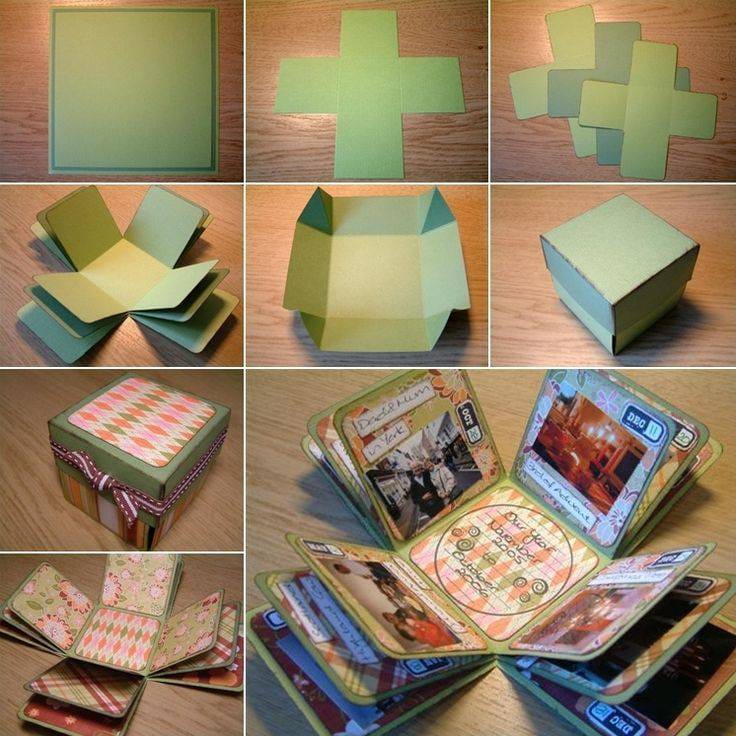
Step 1: Prepare Your Materials of birthday card exploding box.
Gather all your materials in one place. Choose the colours and designs of stock or scrapbook paper you want to use for your exploding box. AWESOME!
Step 2:birthday card exploding box the Cut Square Pieces.
The size of your exploding love box. Typically, a 12×12 inch paper is a good size. Cut four squares of equal size from the stock. These will be the layers of your exploding love box. You can make them smaller if you prefer a smaller box.
Step 3: Fold the Squares of birthday card exploding box.
Fold each square in half diagonally to form a triangle. Then fold it again diagonally to form a smaller triangle. This will help you mark the centre of each square.
Step 4:birthday card exploding box the Mark and Cut.
Open up each square and mark the centre point. Then, using a ruler, draw four lines from the centre point to the corners, forming an “+”. Cut along these lines, but only up to the centre point of birthday card.
Step 5: Assemble the Base of birthday card exploding box.
Take one of the squares and apply glue or double-sided tape to one of the triangles. Attach another square to it by aligning the edges of the triangles. Repeat this process until you have all four squares attached, forming a larger square. To complete the exploding love box, happy birthday card layers.
Step 6:birthday card exploding box of decorate the Inside Layers.
Now it’s time to decorate the inside of each layer. You can add photos, written messages, or decorative elements to each panel. Get creative with your designs and make each layer unique.
Step 7: Create the Lid.
Cut another square of birthday card stock that is slightly larger than the base of your exploding love box birthday card. This will be the lid. Decorate it as you like, but keep it simpler than the inside layers to ensure it fits nicely over the box.
Step 8: Attach the Lid
Attach the lid to the top layer of the exploding box using glue or double-sided tape. Make sure it’s securely attached but still easy to lift off.
Step 9: Add Final Touches.
Decorate the outside of the exploding box with additional embellishments like ribbons, stickers, or drawings. Personalise it according to the recipient’s taste and the occasion.
Step 10: Surprise and Delight.
Once everything is decorated and assembled, close the lid and present to your loved one. When they open it, the layers will unfold, revealing the surprises inside! this is a amazing and beautiful gift.
Enjoy the process of creating this unique and thoughtful exploding love box happy birthday card! thanks for your attention. following this steps carefully and make your own exploding box of birthday card.
summary:
Materials: Gather card stock, scissors, glue, ruler, decorations.
Cut & Fold: Cut four squares, fold diagonally twice.
Mark & Attach: Mark centres, cut and attach squares to form a bigger square.
Decorate Inside: Add photos, messages.
Create Lid: Cut larger square for lid, decorate.
Attach Lid: Glue lid to top layer securely.
Final Touches: Decorate outside.
Present: Close lid and surprise your loved one!
Enjoy crafting and celebrating the special occasion Hurrah!
Follow these steps and make your own birthday card exploding box.