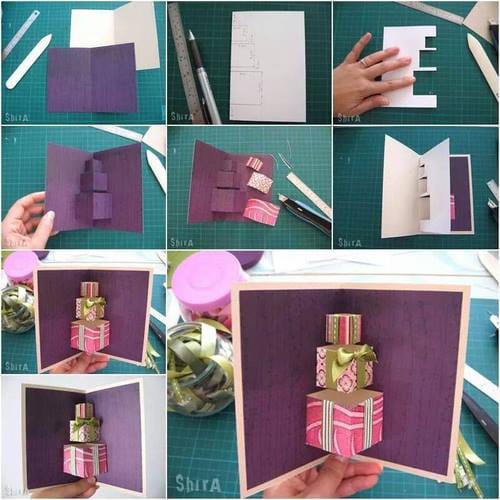
How to make amazing pop-up birthday card for beginners guide in 8 steps:
Creating lovely a pop-up birthday card can be a fun and creative project. Here’s a step-by-step guide to help you make one:
Materials Needed:
- Coloured card stock or heavy paper for the card base
- Decorative paper for the gift box and decorations
- Scissors
- Glue or double-sided tape
- Markers or pens for decorating (optional)
- Ruler
- Pencil
- Ribbon or other embellishments (optional)
Step 1: Prepare Your Materials for pop-up birthday card
Gather all the materials you’ll need for the project. Choose the colours and patterns you want for your card.
Step 2: pop-up birthday card of Cut the Card Base
Take the coloured card stock or heavy paper and cut it to your desired size for the card base. A standard size for a greeting card is typically around 5×7 inches, but you can adjust according to your preference.
Step 3: Design the Card Front
On the front of the card, you can write “Happy Birthday” or any other message you’d like using markers or coloured pencils. You can also decorate it with stickers, drawings, or any other embellishments.
Step 4: Plan Your Pop-Up Design
Think about what you want to pop up when the card is opened. Common elements for pop-up birthday card include balloons, cakes, presents, or even a simple “Happy Birthday” message. Sketch out your design lightly with a pencil on another piece of coloured paper.
Step 5: Cut Out Your Pop-Up Elements
Using scissors, carefully cut out your pop-up design. Make sure to leave tabs at the bottom of each element to attach them to the card. You may need to fold or crease certain parts to make them stand up when the card is opened.
Step 6: Attach Pop-Up Elements to the Card
Open your card and place your pop-up elements inside, arranging them how you’d like them to appear when the card is opened. Use a glue stick or double-sided tape to attach the tabs of your pop-up elements to the inside of the card. Press down firmly to ensure they stick securely.
Step 7: Add Decorative Touches
Once your pop-up elements are attached, you can further decorate the inside of the card with markers, stickers, or any other embellishments. You can also add a message or additional drawings around the pop-up elements.
Step 8: Personalise the Card
Write a personal message to the recipient on the inside of the card, expressing your birthday wishes. You can also add any other personal touches or decorations to make the card unique.
Step 9: Final Touches in pop-up birthday card
Before presenting the card, double-check to make sure all the elements are securely attached and that the card opens and closes smoothly. Trim any excess paper if necessary.
Step 10: Present Your Pop-Up Birthday Card
Once you’re satisfied with your card, it’s ready to be given to the birthday person! Present it with a smile and watch their delight as they open the card to reveal the pop-up surprise inside.
Feel free to customise this basic guide with your own creative ideas and designs to make a truly unique pop-up birthday card!
summary:
A pop-up birthday card is a creative and personalised way to celebrate someone’s special day. It involves designing and crafting a card with elements that “pop up” when the card is opened, adding an element of surprise and delight. Here’s a summary of the steps involved:
Materials Preparation: Gather coloured cardstock, scissors, glue, markers, and any decorative materials.
Card Base: Fold a piece of cardstock in half horizontally to create the card base.
Front Design: Decorate the front of the card with a birthday message and embellishments.
Pop-Up Design Planning: Sketch out a design for the pop-up elements, considering balloons, cakes, or presents.
Cut Out Pop-Up Elements: Carefully cut out the pop-up elements from coloured paper, leaving tabs at the bottom.
Attach Pop-Up Elements: Use glue or double-sided tape to attach the tabs of the pop-up elements inside the card.
Decorative Touches: Add additional decorations and personal messages around the pop-up elements.
Personalise: Write a heartfelt message to the recipient inside the card.
Final Check: Ensure all elements are securely attached and the card opens smoothly.
Presentation: Present the pop-up birthday card to the recipient with a smile and watch their joy as they open it.
Creating a pop-up birthday card allows for customization and creativity, making it a memorable and cherished gift for the birthday person.